How to set up event tracking in Google Tag Manager
When clients engage in SEO or PPC activity, their key objective tends to be ‘we want to generate more online enquiries’. You can drive considerable amounts of organic/paid traffic to a website through effective SEO and PPC campaigns, but how many are actually converting? This is where event tracking comes into its own.
Event tracking can allow you track many devices, including:
- Phone numbers
- Emails
- PDF downloads
- Enquiry forms
This is very much dependent on the services your client offers and how the website has been built. Events can also be tracked as goals, as this may align well with the business’ objectives.
When carrying out conversion tracking, we tend to use Google Tag Manager.
What is Google Tag Manager?
Google Tag Manager is a tag management system that allows you to upload codes and tags on your website or mobile app. This is a blessing for digital marketers who aren’t experts at reading or amending code, as the clean and user-friendly interface allows you to trial and test your tags and triggers before publishing.
In this guide, we will show you how to set up three simple conversion devices on your client’s website. We will be tracking phone numbers, emails and enquiry forms.
Syncing up Google Analytics to your GTM Container
Firstly, you’ll need to sync your Google Analytics with your GTM container to ensure all the relevant codes are uploaded to the right website and to determine your goals are correctly pulling in from Google Analytics.
This can be executed in the variable section. Simply select ‘New’ and choose the option ‘Constant’:
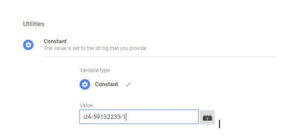
Enter your analytics tracking ID and then save and publish. You have now successfully synced up your analytics property to your GTM container.
How to set up email leads
Setting up the Trigger
Firstly, we need to set up our trigger. The role of the trigger is to lay the foundations of the device you want to track, for example if you wanted to track email leads, you’ll want to track the activity of when users click every ‘mailto:’ (email address clicks).
To set this up:
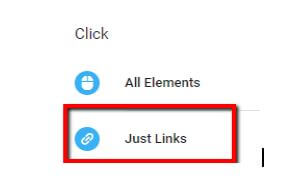
Head to the trigger section and select a ‘new’. The trigger type you’ll want to select is ‘Click – Just Links’. This is used to identify any type of anchor tag, i.e. ‘mailto:’
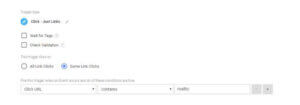
You will then select ‘some link clicks’ to open the options up of what click action you want to capture. Select ‘Click URL’ and design it to capture any click contains ‘mailto’:
Setting up the Tag
Now we have the trigger setup, it’s time to set up and fire the tag. The tag contains all the GA components that we’ll later input to the GA goals section.
To set up the tag simply:
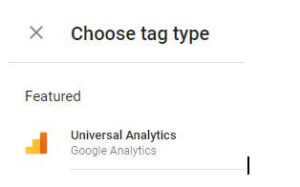
Head over to the tag section and click ‘new’. You’ll want to start by selecting the tag type, which is ‘Universal Analytics’:
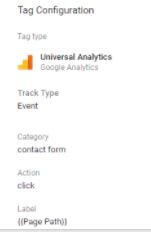
Once selected, select the track type to ‘event’. The next two sections are designed to customise your event by naming the category and action. In this case we will be inputting the category as ‘email’ and the action as ‘click’, a fairly simple customisation.
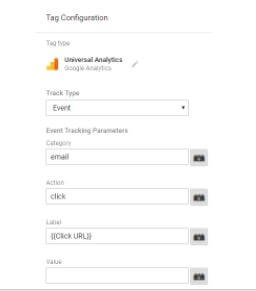
We’re using the ‘Click URL’ feature as this returns a string contained in the href or action attribute value of the auto-event element.
You will then sync it to your GA tracking ID as below:
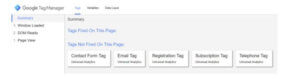
Lastly, you’ll pair your trigger you previously set up and pair it up with your newly created tag. You should see this in your container:
![]()
Testing is Key
Once you’re happy with your tag and trigger for your conversion device, it’s important to test it live on the website using the preview feature GTM provides. Simply select the preview button (next to publish) and in a new tab, load up the website.
You should see a box at the bottom of the page:
You can then navigate to the clickable email link and test it. A successfully set up tag should fire when clicking on the email on the website.
Once you’re happy, you can debug the preview feature in the container and publish:

*To set up telephone devices, follow the exact same steps but change your trigger to fire to ‘tel:’ and the relevant customisation for the GA tag.
How to track enquiry forms
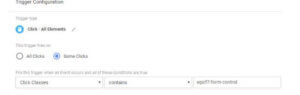
Firstly, create a trigger in the container and name it ‘Enquiry Form Trigger’. You will then select the trigger type to be ‘Click – All Elements’. This will ensure the trigger listens to all HTML elements as we will be inputting some click classes code into the trigger device.
You should then navigate to your website and ‘inspect element’ on the ‘send’ or ‘submit’ button on the contact form. This will provide you with the HTML coding behind the button.
We recommend taking the click classes information and inputting this into the GTM trigger:
Click save and head to the ‘tag’ section. Create a new tag and name it ‘Enquiry Form Tag’. Once again, select the ‘Universal Analytics’ option and create an event tag. You can then customise the tag, similar to the previous tags for the email and phone devices.
We have chosen:
as we want it to return a string containing the relevant path of the current page.
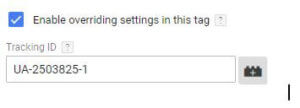
Once again, you can then input your GA tracking code and override the settings in the tag and then pair with your ‘Enquire Form Trigger’ you’ve recently created.
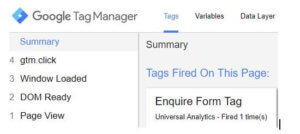
Once you’re happy with both the tag and the trigger, we will test it using the preview debugging process.

Next navigate to the website and click on the ‘send’ or ‘submit’ button on the contact page and see your tag ‘fire’ once clicked:
Once you’re happy with the GTM container and the conversion devices you’ve set up, hit publish and head over to Google Analytics to set up the goals.
Setting up Goal Tracking in Google Analytics
Events can be tracked as goals and this is what we’ll create in Google Analytics.
We’ll begin with our email lead tracking we set up in Google Tag Manager at the start. Head over to your Google Analytics property, click ‘Admin’, then ‘Goals’. Click ‘Create goal’ and you’ll see an interface:
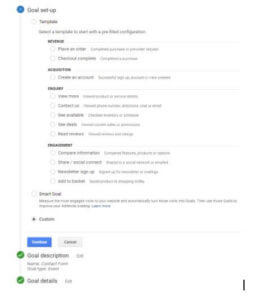
Select custom and then for the ‘goal description’ select event for the type of goal you want to track.
Once you’ve loaded the goal details section, we will input all of the data we previously created in our GTM tag for the email leads:
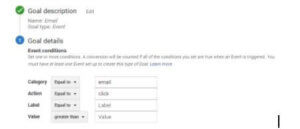
Once completed, click save and you’ll head back to the goals section. You’ve now successfully created email tracking.
*Follow the same steps for the telephone and enquiry form goals. The only difference will be the goal details you input into GA for the last section.
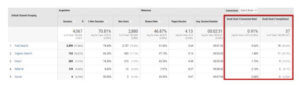
Leads in Action
Now that you have successfully completed even tracking in Google Tag Manager and have created the goals in Analytics, we will be able to see how many online leads are generated and from which channel.
In your Google Analytics property, head over to ‘acquisition>all traffic>channels and see your live goals in action:
We recommend setting up your conversion tracking during the onboarding process for a new client. You will be able to track any online leads that come through early on and therefore prevents any data that has been missed.
Conversion data remains an integral part of both SEO and PPC campaigns and can be an efficient way of displaying gradual growth for your client.
Want cutting-edge digital news and tips straight to your inbox? Sign up to our monthly newsletter here
"*" indicates required fields