Google Tag Manager (V2) : a step by step set up guide
Follow this simple set up guide for Google Tag Manager, which takes you through each process step by step. It’s quick, it’s concise and it’s easy!
If you have a 5 minute attention span, then this guide is for you. Learn what you need to know very quickly and get it done. It covers tracking Google Analytics data, email clicks, phone number clicks, pdf downloads and contact forms – basically all the usual stuff you’d want to track on most websites.
Oh Google Tag Manager, how do I love thee? Let me count the ways…
Development difficulties? Event tracking code simply not working? Contact forms not tracking? Data not quite adding up? Google Tag Manager fixes all of this and makes life very easy. Because all you need to do is ask a developer to install a single piece of tracking code on a website and you’re good to go.
If you’re on WordPress, there’s a Google Tag Manager Plugin you can use. But if you can put the code straight into your site, you really should.
Things to do before you start
- Ensure all email links on your website are clickable
- Ensure all phone number links on your website are clickable
- Ensure forms on your website have a “class” so you can track them
These are all quick and easy things for a developer to do.
You also need to be using Google Tag Manager with the same Google Account which has access to the Google Universal Analytics of the website you are tracking. Otherwise your Google Tag Manager account won’t have access to or be able to share this data.
1: Setting up Google Tag Manager
Setting up Google Tag Manager is really quick and easy. Log in to Google Tag Manager, click ‘Create Account’;
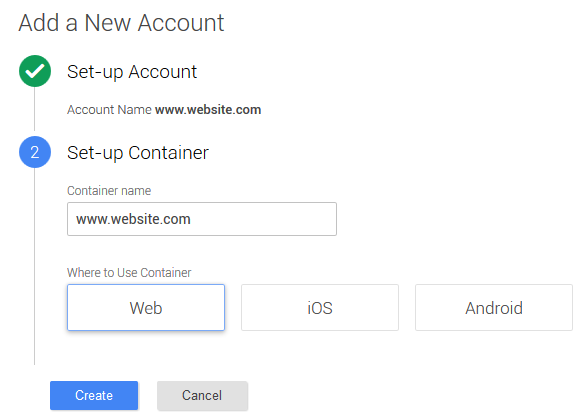
To avoid confusion, I use the web address as the account name and container. You don’t need the http:// at the start of the URL.
And we’re using the Web container.
Once you’ve agreed to the terms and conditions, you’ll be presented with a pop up to install Google Tag Manager tracking code on your website.
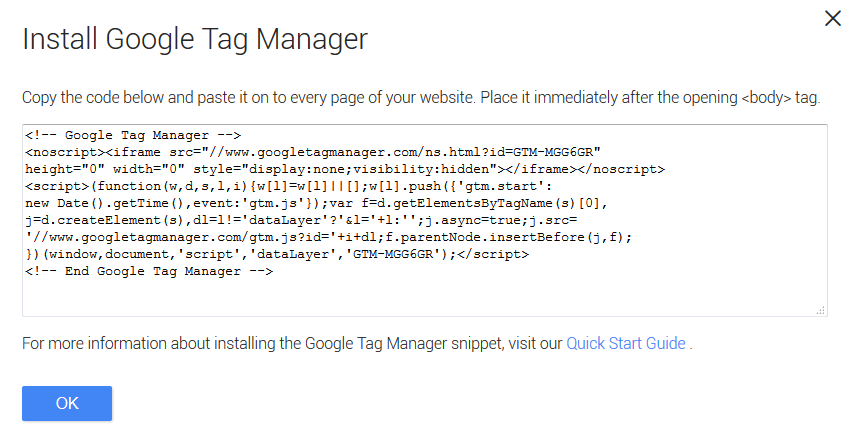
If you need this again, simply click on the Admin tab at the top of the dashboard and click on the Install Google Tag Manager link.
Give your web developer the code and paste it on to every page of your website and ask them to place it immediately after the opening tag. You can always direct them to the quick start guide just to be sure, or do it yourself if you know how.
Now go to the Variables tab on the left hand side and tick the following boxes. This is all the stuff we need to be turned on. Some of these are turned on automatically.
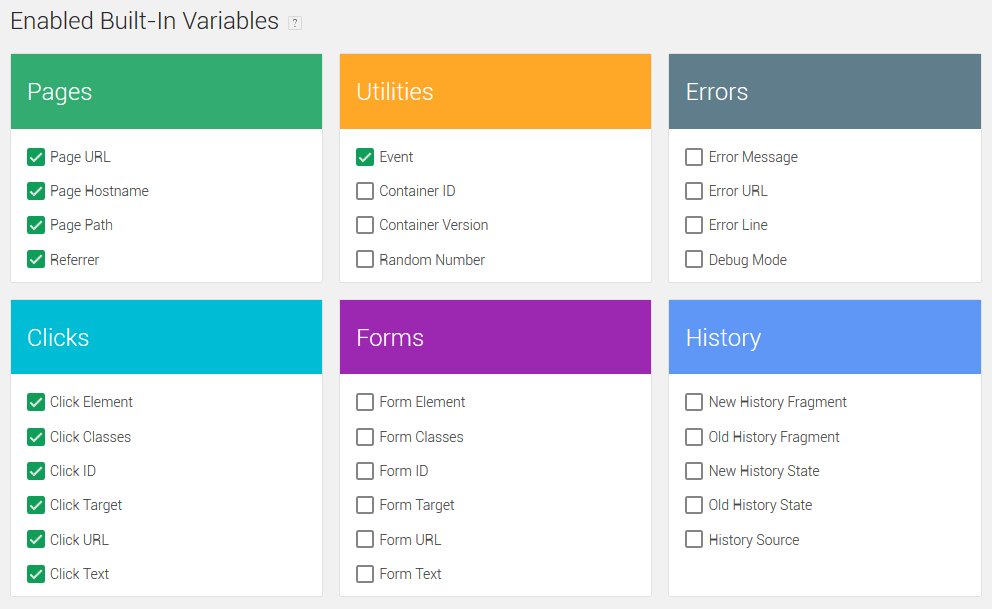
Next, we need to synch Google Tag Manager with Google Analytics. Otherwise all this event data has nowhere to go.
Once you’ve ticked the various variables, scroll down the part of the dashboard called User-Defined Variables and click the NEW button.
![]()
We’ll call this Universal Analytics, because it’s the Google Universal Analytics tracking ID for all our event tracking in Google Tag Manager. It’s constant, because it’s never changing and then we simply add our website’s Universal Analytics tracking code and click Save Variable.
Now we’re ready to rock n’ roll.
2: Tracking Google Analytics with Google Tag Manager
When we started implementing Google Tag Manager for clients, we asked them to remove the Google Analytics Universal tracking code so we could us Google Tag Manager instead.
It sounds good in practice, but if things don’t go smoothly (or happen immediately) there can be a temporary loss or crossover of data.
So if your client already has Google Universal Analytics implemented on their website, I’d recommend leaving it alone and just using Google Tag Manager to track the events (unless you know they can turn it around quickly, or you’re doing this yourself), in which case…
Go to the Tags tab, click New and set up the following.
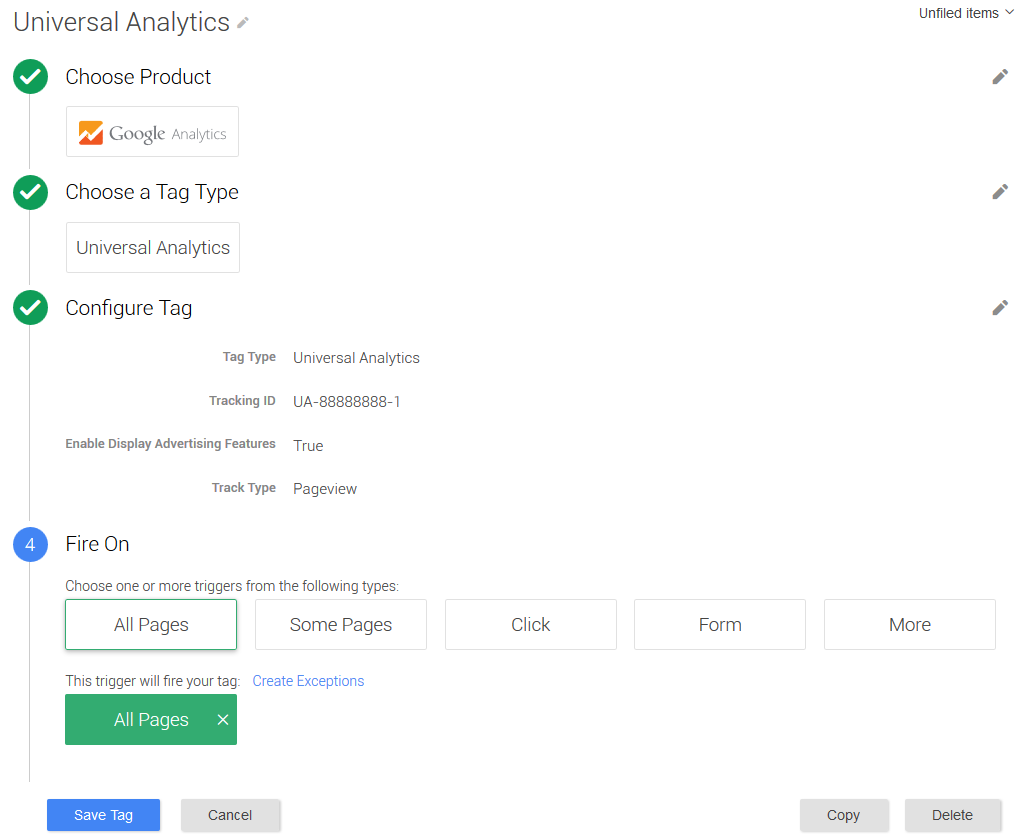
We’re going to call this tag ‘UA Pageview’, because it’s tracking the pageviews in Google Universal Analytics.
Preview and Debug Your Google Tag Manager Tracking.
Always check your work before you hit Publish, just in case you blow something up.
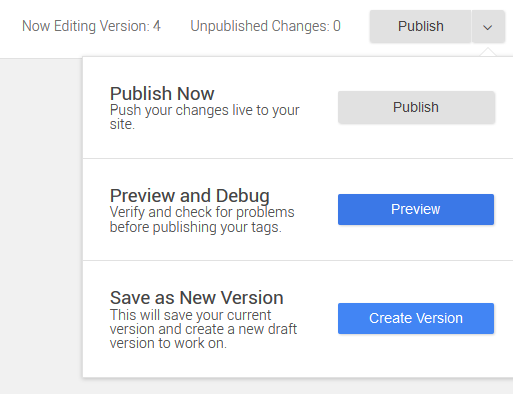
Top right of the page, click on the drop down from Publish and click Preview.
Now open a new tab in your browser and go to your website to preview the changes. You will then see the following appear at the bottom of your screen, letting you know which tags have fired and which have not. This screenshot includes more tags which we will set up in a moment.
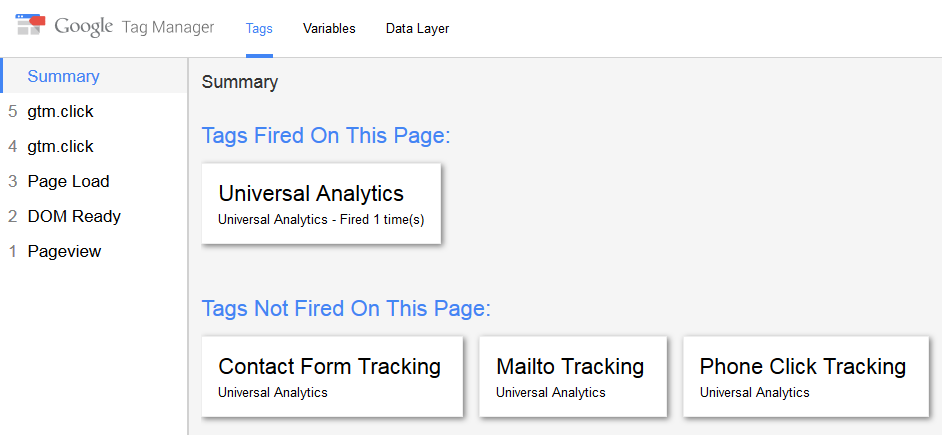
If something is not firing, that means something hasn’t worked. It will usually be a typo or the Google Universal Analytics code being a different one to what the client may have given you access to.
Please note that you can only do this if the Google Tag Manager tracking code has been implemented on your website.
Please also note that the preview function does not work if the WordPress Google Tag Manager Plugin has been used to implement the tracking code.
An Alternative Way to Check if Event Tracking is Working
Log in to your Google Analytics account and go to the website you want to check the tracking of.
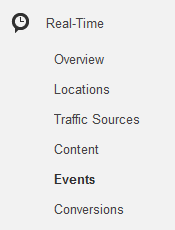
Click on the Real-Time tab on the sidebar. Have another window open and click around the site (make sure you haven’t blocked your IP from the Google Analytics!) and you should see your page views appear in the Overview section.
And if you need to check whether or not your clicks on email and phone number links work, click on a bunch of them and they should appear in the Events section.
3: Tracking Email Clicks with Google Tag Manager
When setting up your event tracking, you will need Tags and Triggers. Triggers do the listening and Tags do the recording in Google Universal Analytics.
First we create the Trigger. We’re telling Google Tag Manager to ‘listen’ for clicks on specific types of links within the website. I called this ‘Click is Mailto’, because that’s what we’re listening for.
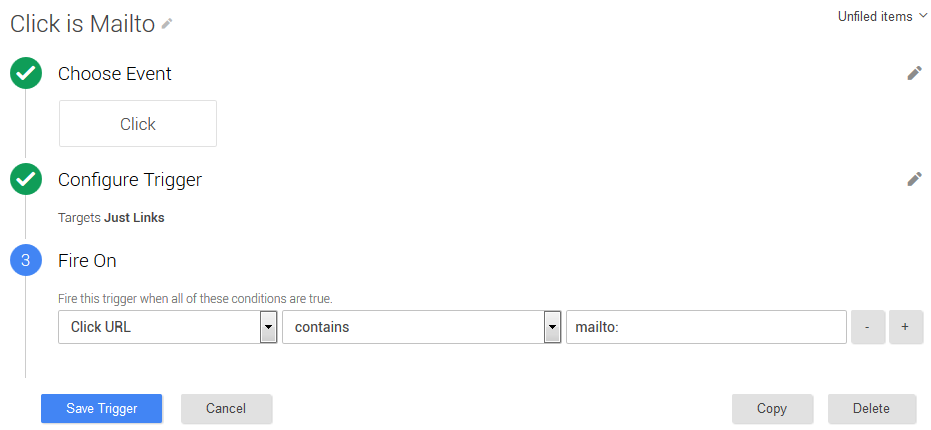
In this case, any clicks on links which contain “mailto:” in the URL
Please note: I don’t bother ticking the boxes for Wait For Tags or Check Validation. I just want it to track quickly.
Next, we create the Tag. I called this ‘Mailto Tracking’, because that’s the kind of link that’s being tracked as an event for Google Universal Analytics.

Please note that the category name you enter here will become the name of the event that’s recorded in Google Analytics.
When you click on what the Tag will fire on, a pop up will appear, allowing you to sync it with one of the Triggers. Obviously, you want the Trigger called ‘Click is Mailto’.
Click on the Save button and you should have successfully set up event tracking for all the email link clicks on your website.
Be sure to Preview and Debug, just to be on the safe side.
4: Tracking Phone Number Clicks with Google Tag Manager
Same as before, except we’re looking to track clicks on a different kind of link.
First we create the Trigger. We’re telling Google Tag Manager to ‘listen’ for clicks on specific types of links within the website. I called this ‘Phone Number Click’.
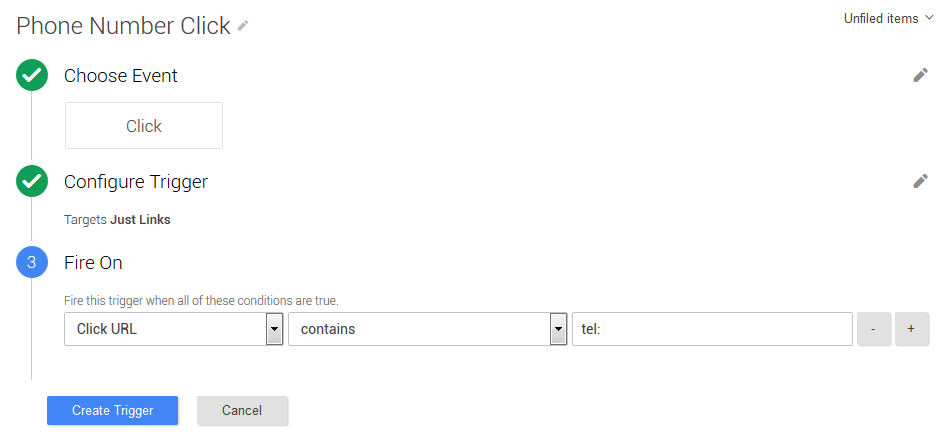
In this case, any clicks on links which contain “tel:” in the URL
Please note: I don’t bother ticking the boxes for Wait For Tags or Check Validation. I just want it to track quickly.
Next, we create the Tag. I called this Phone Click Tracking.
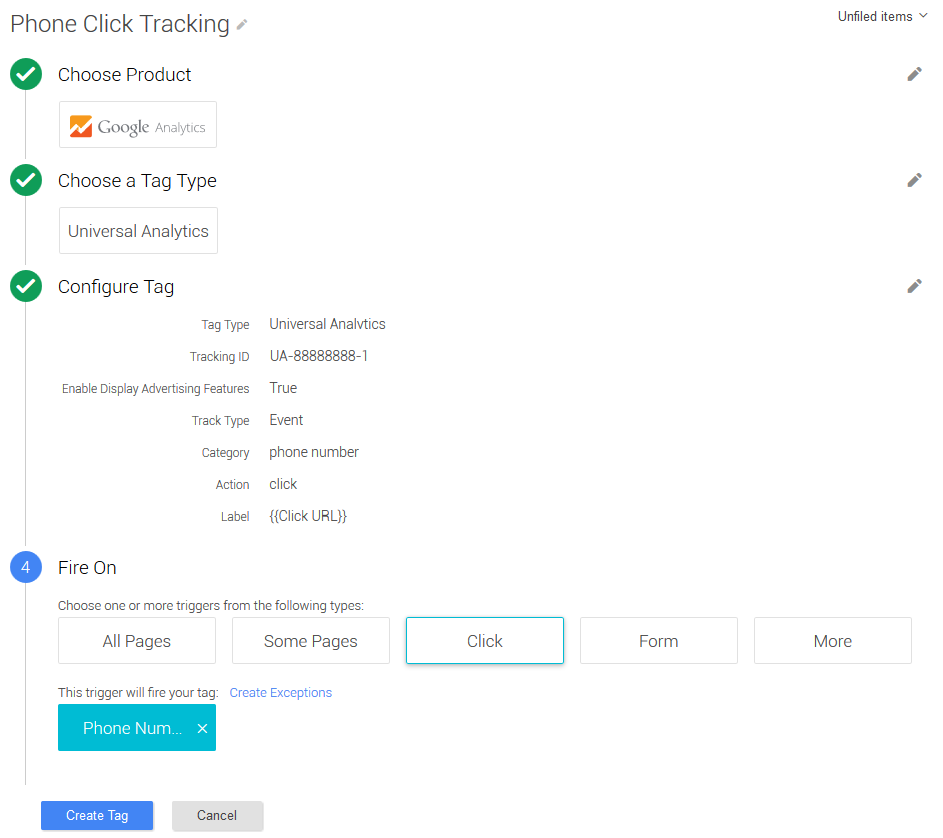
Please note that the category name you enter here will become the name of the event that’s recorded in Google Analytics.
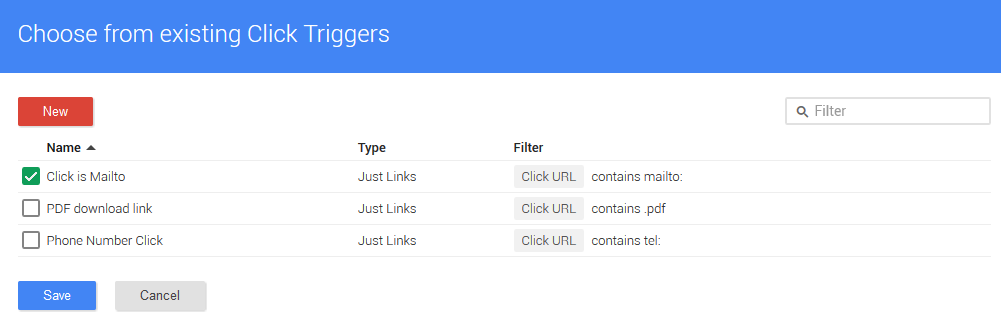
When you click on what the Tag will fire on, a pop up will appear, allowing you to sync it with one of the Triggers. Obviously, you want the Trigger called ‘Phone Number Click’.
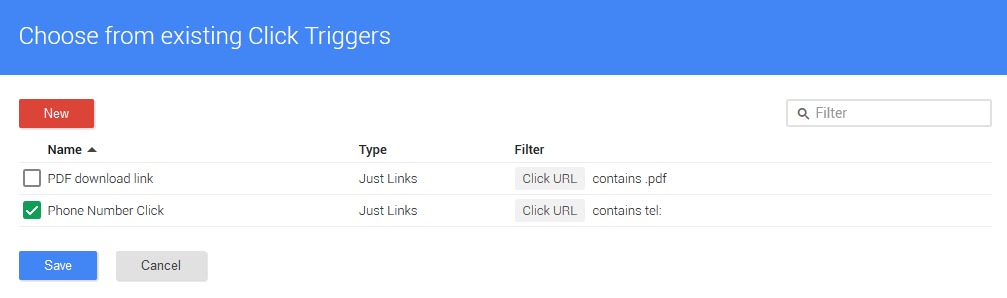
Click on the Save button and you should have successfully set up event tracking for all the phone number link clicks on your website.
Be sure to Preview and Debug, just to be on the safe side.
5: Tracking PDF downloads with Google Tag Manager
More of the same. See, it’s easy when it just works! Once again, we’re changing the type of link we’re tracking.
First we create the Trigger. We’re telling Google Tag Manager to ‘listen’ for clicks on specific types of links within the website. I called this ‘PDF download link’.
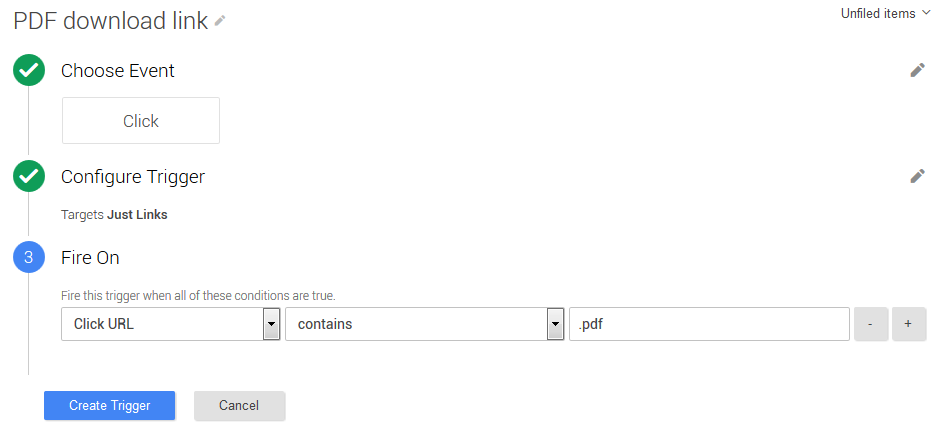
In this case, any clicks on links which contain “.pdf” in the URL.
Please note I don’t bother ticking the boxes for Wait For Tags or Check Validation. I just want it to track quickly.
Next, we create the Tag. I called this ‘PDF Download Tracking’.
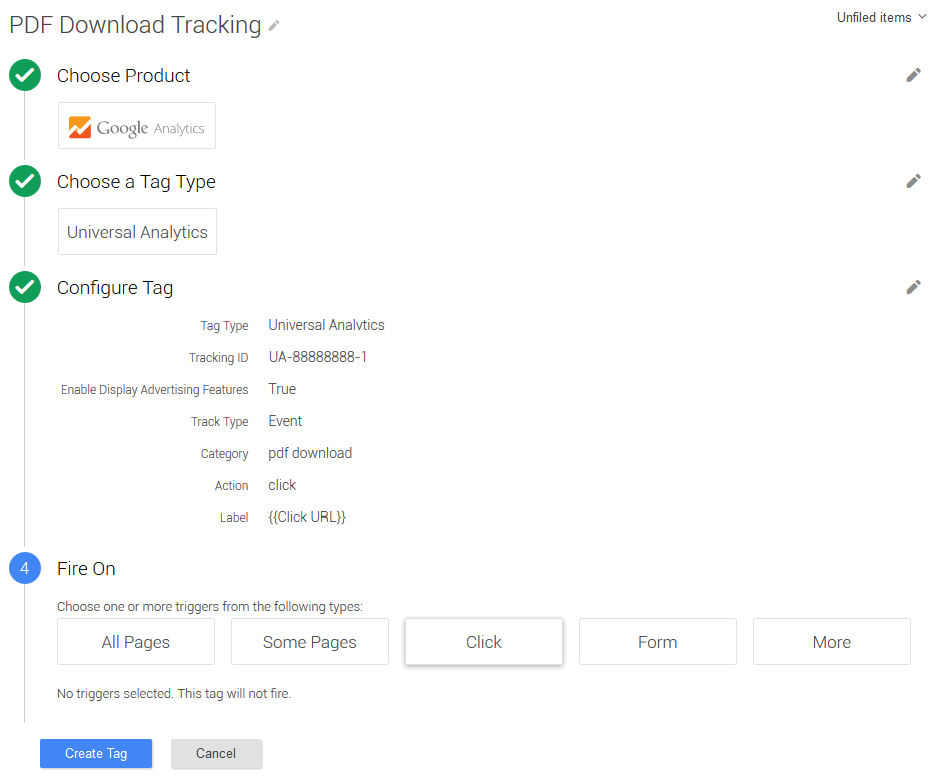
Please note that the category name you enter here will become the name of the event that’s recorded in Google Analytics.
When you click on what the Tag will fire on, a pop up will appear, allowing you to sync it with one of the Triggers. Obviously, you want the Trigger called ‘PDF download link’.
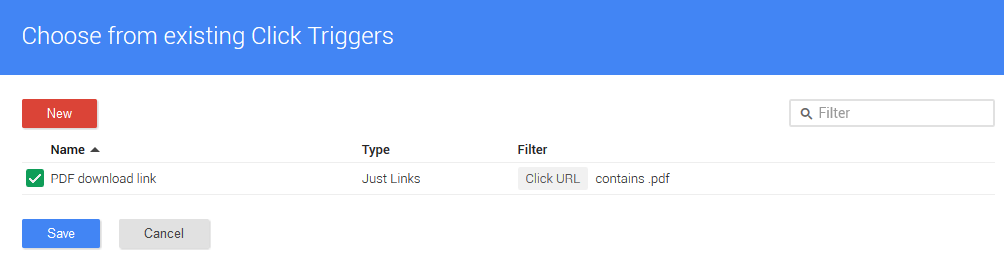
Click on the Save button and you should have successfully set up event tracking for all the PDF link clicks on your website.
Be sure to Preview and Debug, just to be on the safe side.
7: Tracking Contact forms with Google Tag Manager
Now this is where things get a little tricky. Tracking contact forms seems to be a challenge for a lot of people and it perplexed me for some time too. So here’s how you do it.
Set up your trigger, but this time we’re going to track clicks on a button, rather than a link.
First, you need to identify the Class of the button you want to track the clicks on.
Here’s one I tracked earlier.

By right clicking on the button in Google Chrome and selecting Inspect Element from the drop down options, we can see the html code for this button.
In this example the Class is ‘button-gold action-link’. This is what we need to help Google Tag Manager identify what it’s listening out for and tracking.
If the button you want to track doesn’t have a Class, ask your developer to give it one.
First we create the Trigger. We’re telling Google Tag Manager to ‘listen’ for clicks on specific types of links within the website. I called this ‘Forms Click Trigger’.

In this case, any clicks on links which contain “button-gold action-link” in the class.
We cannot track the Click URL like other links, because there isn’t a URL to send users to when they click this button.
Please note I don’t bother ticking the boxes for Wait For Tags or Check Validation. I just want it to track quickly.
Next, we create the Tag. I called this Contact Form Tracking.
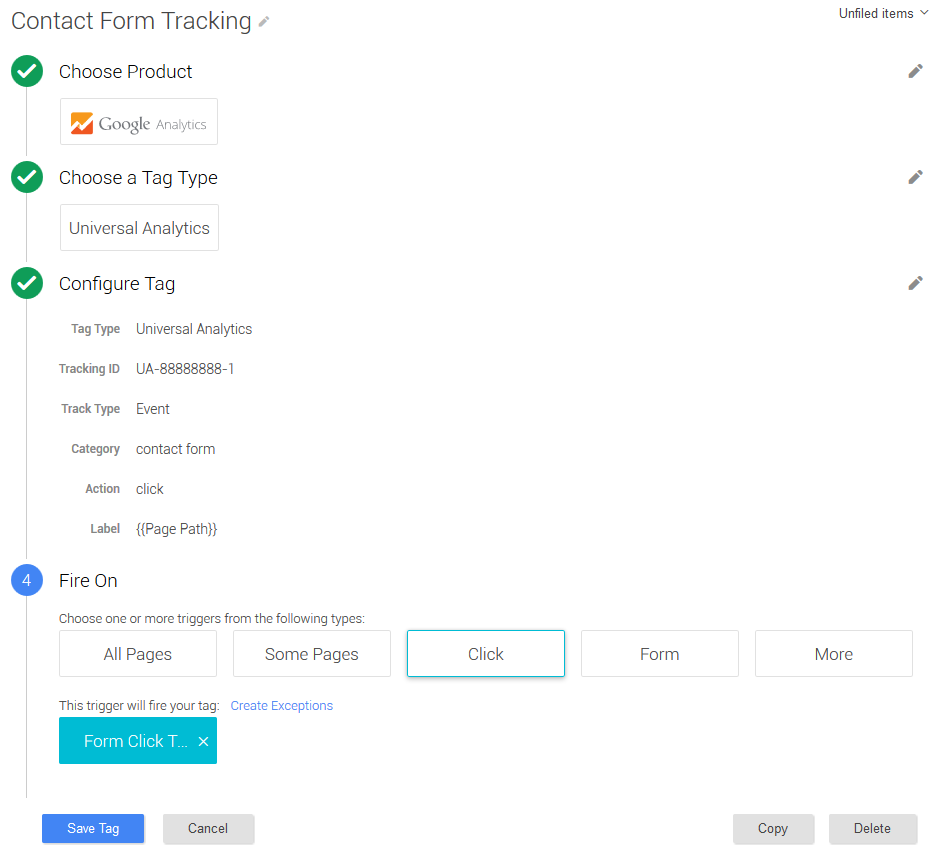
Please note that the category name you enter here will become the name of the event that’s recorded in Google Analytics.
When you click on what the Tag will fire on, a pop up will appear, allowing you to sync it with one of the Triggers. Obviously, you want the Trigger called ‘Form Click Tracking’.
Click on the Save button and you should have successfully set up event tracking for all the clicks on this button.
Be sure to Preview and Debug, just to be on the safe side.
Important Notes:
Please check the classes of buttons on the website before setting up this tracking. Although it is unlikely, there is a chance that the same button class may be used on a wide range of buttons throughout the website, not just the one you wish to track.
In which case, ask your developer to give the button you do wish to track a different class.
Clicking buttons on some forms can cause page refreshes or send users to different parts of a website. As a result, these clicks do not appear to track in the Preview and Debug window. In these instances, use the Alternative Way to Check if Event Tracking is Working explained earlier in this article.
Finally, an alternative to tracking contact forms in this way is asking the web developer to send users to a /thank-you URL once a user has completed a form. This URL is much easier to track in Google Analytics by counting visits to this page as a Goal. But sometimes this isn’t always possible, which is why we usually track contact forms in Google Tag Manager to minimise our dependency on developers.
Conclusion
This is just the tip of the iceberg when it comes to what you can track in Google Tag Manager. It’s a brilliant tool, but does take some getting used to.
Hopefully this essential guide will help you to set up the basics and will help you understand what visitors to your website are doing and how they are converting.
I also like the fact that you can verify Google Search Console using Google Tag Manager (providing the tracking code has been implemented of course), it provides a good alternative to verification if the developer hasn’t put the Google Analytics tracking code in the section of a website.
Once again, this all minimises the work required by developers.
Let me know if you have any questions in the comments below and I’ll do my best to answer them.
Want cutting-edge digital news and tips straight to your inbox? Sign up to our monthly newsletter here
"*" indicates required fields